Sunday, February 28, 2010

Goodwill Still Life

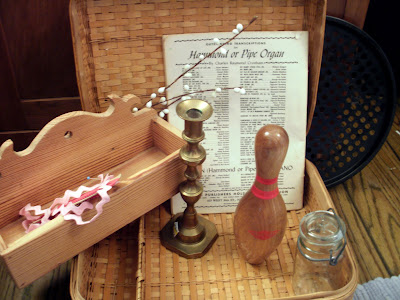
What a weekend! A trip to Goodwill yielded quite the treasure trove.
After seeing so many fun projects made from vintage sheet music, I was pretty excited to find my own music book. The candle stick and bowling pin are most likely destined for a coat of paint. I'll probably paint or stain the wood box. I have no idea what I'm going to do with it, but it was too cute leave behind. I never pass up vintage trimmings, so the pink rick rack will feel perfectly at home with the rest of my stash. I loved the tiny size of this canning jar, and I'm sure it will be a very sweet vase for some wild flowers this summer.
I’m completely smitten with this old picnic or sewing basket. It’s sure to make for some stylish storage around the roost. I’m torn as to whether I want to leave it as is or give it a shabby aqua paint job for a little beachy kick. What do you think?

On Saturday, I also salvaged these vintage items from my Granddad’s house. I’m going to use the band aid tin to copy a brushed nickel container I saw at Pottery Barn.

I hope y’all had a wonderful weekend as well! Did anything fun/exciting/thrifty happen in your neck of the woods?

<3
Hattie

Thursday, February 25, 2010

Thanks for the love!

My lovely twin soul, Tracy, was nice enough to pass this blogging award on to me.

Here are the rules:

1. Thank the person who nominated you for this award.
2. Copy the award & place it on your blog.
3. Link to the person who nominated you for this award.
4. Share 5 interesting things about yourself.
5.Nominate 7 bloggers and let them know on their blog.

Thanks Tracy! It was so sweet of you to think of me. I love reading your creative and inspiring blog because it makes me feel like I’m a part of your everyday life, even though I don’t get to see you that often.

Oh, and also, I’m totally copying you and relating all of my interesting facts to home décor!

Here we go!

1. I hate shoes. To be more accurate, I love looking at shoes, but I hate wearing them. As a kid, I went around barefoot most of the time. The goal was always to have thick enough calluses to run over the gravel driveway by the end of summer. I still kick my shoes off the second I enter the house. I think that’s why I love earthy, natural floor coverings.
I love to feel wood and sisal and jute under my feet. It’s like being transported back to all those long, barefoot summers. No carpet for this girl!

2. I could happily lounge on a blanket and stare at this sky for hours.
I’m a total country girl. I think I’ve unconsciously tried to recreate the vibe of endless sky and rolling fields inside the roost.
So many of my little vignettes have been shades of blue, green, and cream!

3. As much as I love the spare, modern cottage look, it’s just not for me. I am collector. I tend to accumulate like items without even knowing it. It was cows and colored bottles as a teenager and now it's retro kitchen items and paint by number art.
Is it any wonder I also have a secret yearning to start a vintage door knob collection?

4. I think I have a twinge of seasonal affectedness disorder. I always get a little case of the winter blues. One sure tonic is a bright bouquet of early spring flowers.
Seriously, those blooms are as good as medicine. So, I hope you’re not tired of my gratuitous flower posts, because they probably won’t end until all traces of snow have been banished.

5. It’s no secret I love books – it’s part of the Librarian code or something. I don’t just love reading them, however. I love how they look and smell and feel.
They are my favorite decorating accessory. I think books add so much texture, personality, and hominess to any corner of a house.

In lue of passing this award along to a specific group of blogs, I’d like to pass it on to all of you, in the hopes that you’ll let me in on an interesting fact about you. So do tell, how does your personality show up in your decorating preferences? I’m super curious!

<3
Hattie
Tuesday, February 23, 2010

Daisy Day

Remember the sweet Valentine’s bouquet I received from my even sweeter husband? Well the daisies are still chugging along!

The roses dried up, but the daisies just keep going – yet another reason to love them!
I think they look so sunny on the kitchen table.
I can’t wait till it’s warm enough for beauties like this to line the edges of the fields around the roost.

I told you the roses dried up, but I salvaged them.
I think they have a faded, romantic look.
Although, I sometimes think I might be a little nuts for sticking old roses in an IKEA spice jar.
But then I get over it and swoon over them a little
I’m weird like that.

How do you make your flowers last longer? Does anyone else keep dried roses?

<3
Hattie

Monday, February 22, 2010

a little nesty

It’s a very springy DIY Day here at the roost! I figured it was time to change out my little Valentine’s Day display for something more neutral. Oh course, when I think neutral, I think birds! It’s an obsession, a problem, perfectly normal.

I got the ball rolling by making some super fun (and practically free) paper nests.
You only need two supplies: Shredded paper and mod podge. White glue would probably also work. I wanted my nest to have a little color and texture variation, so I shredded one sheet of brown construction paper, one paper grocery bag, and a smidge of junk mail.
To form the nest, grab a hunk of paper, dab on each side with a generous plop of mod podge, and smoosh until everything sticks together.
Grab another hunk of paper and repeat, adding the new hunk to the old hunk. As you add the gluey bits of paper, form into a bowl/nest shape.
This is not hard at all, but your hands will be completely covered in glue. After your nest has reached the desired size, set aside to dry for thirty minutes.
Now that you have a cute little nest, you can display it however you want. It would be cute filled with moss and blown eggs, or a sweet little birdie.

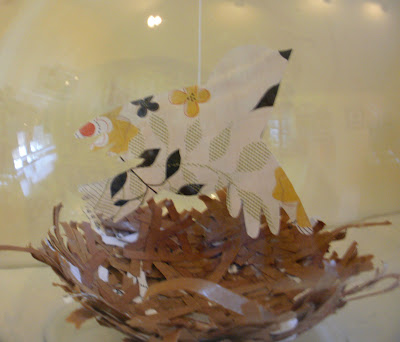
I knew I wanted to display my nests in my glass fishbowls, and I thought it would be really cute to make paper birds to fly over the nests. I traced a clipart bird silhouette onto some scrapbook paper,
and used thread to attach them to sticks.

The finished product didn’t photograph very well (glass plus many windows = reflection city) but I think you get the idea.

Here’s a little close up of the birds.


I love how this turned out! It’s very clean and modern, but still cute and seasonal.

Am I the only one still obsessed in love with bird décor?

<3
Hattie

Sunday, February 21, 2010

Garden Party

Brad and I got a much needed dose of spring this weekend. Not only were temperatures in the 50’s, but the home and garden show was in town as well. The home portion of the show was a bit of a disappointment. I expected lots of room vignettes and decorating ideas, but it was mostly companies selling siding, water filtration systems, sunrooms, and inexplicably, several booths selling dip. On the bright side, the garden portion of the show was amazing. Local garden and landscaping companies created spectacular gardens right inside the convention center. I took a few covert pictures of some of my favorites. The picture quality isn’t the best, but I did what I could!


This cozy seating area was part of “Monet’s Garden” my favorite display. This garden had many little seating nooks and a bridge. I wish I could have taken pictures of every bit of it!
I’ve always loved wrought iron garden furniture, but you usually only see it in dark green or white. This gorgeous grey/green was unexpected, but very fresh and fun.
I heart stone edging! I thought these skinny little beds were so sweet and dainty.
This is the most beautiful mailbox I have ever seen. I would love to build something like this one day.
I'm sorry this photo is so grainy, but I fell in love with this awesome stone patio and I had to show you. I think I am completely smitten with stone pavers and edging. They are classy but not too formal, and really give a garden area that extra something.
This is by far the coolest play house I have every seen! What kid wouldn’t love their very own Hobbit hole? This wasn’t the splashiest display, but I thought it was the most creative.

It was lovely to be surrounded by beautiful spring gardens, if only for a few hours! C'mon March!

<3
Hattie
Thursday, February 18, 2010

Care to Counter?

Since it’s fun to spend cold winter days dreaming, let’s do a little countertop wishing.

Brad and I have lovely white cabinets and laminate counters in the roost.
I think they look pretty good, and they’ve held up well so far. But. When we build (one day. In the far future), I’d love to have beautiful white cabinets and a higher grade countertop. I’m torn between a few options - luckily, I have lots of time to choose!
Have you seen the new corian private collection? I really like the look of rain cloud. Pretty close to marble, yes? If anyone has these, please let me know what you think of them!
I also really like butcher block. I think I will definitely use it for my island, but I’m not sure I want to commit to using it for all the counters as well.

So, spill the beans! What kind of counters do you have? Do you like them? If you could have dream countertops what kind would you pick? I can’t wait to hear what you think!

<3
Hattie

Tuesday, February 16, 2010

As Seen on TV

My husband loves gadgets. I mean, he LOVES them. This man could spend hours in Brookstone. On Friday, we had a conversation in Target that went something like this:


Me: “Why is there a Shark portable steam pocket in our cart?”

Brad: “Do you know how many attachments this thing comes with? It has the wedge tool, the duster, the scrub brush, a cylinder…”

Me: “But why is it in our cart?”

Brad: “Guess how much it is? Twenty bucks cheaper than on TV!”

Me: “If we buy it, do you promise to use it tomorrow to clean the whole house.”

Brad: “Yes!”

Me: “Sold!”

I’m always skeptical of infomercial products, so I thought I’d take a few action shots as Brad put the steam pocket to work.

First he used the duster tool to go over every bit of fabric in the roost. He did the curtains, furniture, pillows, and mattress. I have a horrible dust allergy, so this is one of the features I was the most excited about. The house definitely smelled and felt fresher after this, and the steam didn’t soak any of the fabric. I really have no idea if it actually killed any dust mites, but I certainly haven’t sneezed any more than normal and I have had less sinus headaches.

Next, Brad went over all the kitchen cabinets and counters with the wedge tool.

Before:

After:

I liked the results, but this tool is not a miracle worker. It cleaned the areas I normally clean every week like a charm, but it did not fix some bad grease spots I’ve been trying to get rid of for awhile. If you use this to clean a fresh mess, you’ll probably be fine, but it’s not the answer to your ancient stains.
The scrubby brush went to work in the shower and the sink
And the cylinder pocket fit all around the faucet.

I’m happy with this purchase, but I don’t think it’s going to replace all my cleaning supplies. I love that it can be used to freshen fabric and steam wrinkles out of clothes. I think I’ll use it every week for my regular kitchen and bathroom cleaning. But – for big messes or stubborn stains, I’ll need to fall back on more traditional cleaning supplies.

Note: Shark did not compensate me in anyway for this review.

Now, spill: What is your favorite cleaning gadget? Just don’t tell my husband!

<3
Hattie

Monday, February 15, 2010

I've got a bluebird on my shoulder

Hey y’all! I decided that DIY Day was the perfect time to show you my first attempt at an Anthro knock off. I was inspired by the mix of fabric, lace, and beads used in a lot of Anthro’s jewelry, so I decided to give it a whirl. I ended up with this sweet necklace...

... and this girly bracelet.
Want to make your own? Keep reading!
First, find fabric with a small print. I used a tea towel I picked up at Goodwill that featured state birds. You could always find a pretty image and print it on iron-on paper if you don’t have a fabric you like.
You will also need a coordinating fabric to make the ruffle; ribbon, seam tape, or lace for the ties; and a cheap beaded necklace. The kind where the beads do not move is best.
This one came from the dollar spot at Target.
Cut out a small circle from your fabric.
Cut a strip about half an inch wide from your coordinating fabric. About ½ a centimeter from the edge, baste with a long stitch.
Pull the threads together to create a circle ruffle. Knot the ends or sew together.
Use a few stitches to secure your printed circle to your ruffled circle.
Cut your beaded necklace to just slightly shorter than your desired length.

Sew ribbon, seam tape, or lace around the last bead on each end of the shortened necklace and knot right above.
Decide where you would like to place your fabric embellishment. I went for a slightly asymmetrical look. Place the embellishment on one side of the beads and a small piece of fabric or felt on the other side. Secure with hot glue or a few stitches.
Now you have an artsy, vintagey, girly necklace.
If you’re lucky, your leftover length of beaded necklace will be long enough for a bracelet. If it is, sew ribbon, lace, or seam tape to the end of each bead, just as you did for the necklace ties. Wrap around your wrist and tie in a pretty bow.
Relish the fact that you spent pennies on a look that costs big bucks at the fancy stores!
Wear your new jewlery everyday so you have a little bit of spring close by!

<3
Hattie