Thursday, April 29, 2010

If you want to destroy my sweater...

I refashioned a sweater into a cardigan for my sister. The gifting went something like this: “I made you a sweater.” “Yay! It’s so cute.” “Thanks, try it on so I can take a picture.” “It doesn’t match my outfit.” “I know, but I need a picture for the blog.” “Ok, but I don’t want people to think I’d mix patterns like this.”


Clearly I am an awesome sister. And yes, Hannah would never wear clashing patterns. And yes, I frequently make people do things so I can blog about it. I know.

Moving on to the tutorial,


Take your basic sweater and cut straight down the middle.


If you want to shorten the sleeves, cut off the cuffs. Cut the sleeves again to your desired length.


Gather the newly shortened cut edges to match up with the size of the cuffs.


Place the cuff over the gathered sleeve with the wrong sides together. Pin and sew.


When you flip the cuff down, it should look like this. If I made no sense at all, Check out Disney’s tutorial. She’s very good at explaining this kind of thing!

Now it’s time to fix the front. Hem both sides where you cut the front open.


Decorate your new cardigan edges in a fun way. You could use seam tape, ribbon, ruffles, or the double ruffle like I did. I sewed a long tube of the same fabric to act as a belt/sash for the sweater and added two little fabric flowers to the neckline.


This was a really quick and fun project and could be changed up in a lot of ways to create a bunch of different cardigans. I actually saved this sweater from my Goodwill pile and now it has a new life. I think I’ll make a few more of these soon!

<3
Hattie

Tuesday, April 27, 2010

And a little bit about Bamboo

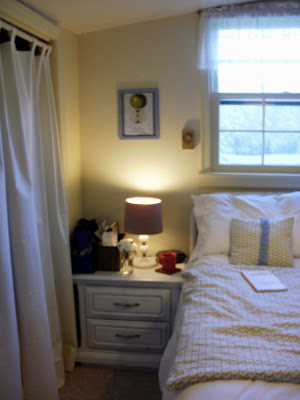
Let’s talk about bamboo blinds. Let’s talk about how much I looooove them. This love turned into the need to switch out our bedroom window treatment from this lacy valance,

To bamboo!

I super, super love the change!


I think it works so much better with the calm, natural vibe I’m going for in this room.


The question is, should I take it a step further a la Young House Love and my twin soul Tracy and add sheer white curtain panels?

Since the ceiling is slanted (fun fact: all the ceilings in the roost are slanted!) I’m not sure it would look right.

Hmmm. Thoughts?

<3
Hattie

Monday, April 26, 2010

From out like a light to out on the town


Well y’all, I mustered up all my DIY Day courage and decided to tackle my biggest sewing challenge yet: a whole dress. Or, umm.. a night shirt,


refashioned into a dress.

Otherwise known as, “how to spend five hours getting to know your seam ripper really well, but ending up with a cute dress that costs less than a buck.”

First step, cut off the sleeves at the seam.


Second, ruffle the sleeves by sewing across the shoulder seam with the stitch length set to 5 and the tension set to 9.

Next (and this is where it gets tricky) try the “dress” on inside out and pin where you need to take the armholes in to give the dress a better fit. I also pinned a bit down the sides to give a slimmer fit, but you could skip this if you want the bust of the dress to be more loose and blousy. Sew where you pinned.


Now, try the dress on right side out and figure out where you want to gather the waist. MARK THIS VERY WELL! I did not and suffered the consequences.


You need to make a casing for your elastic waist. I cheated and used the waist band from an old t-shirt, since it was already sewed into a nice tube the right size for my elastic. Noting where you marked for the waist band, sew the casing to your dress, as close to the edge of the fabric as you can manage. Leave a little extra fabric and keep each end open. Thread your elastic through the casing. I cut my elastic about two inches shorter than the size of my waist. Sew the ends of the elastic together, and overlap some of your extra casing fabric to create a finished band. I had to do this whole process twice because the first time my elastic was crooked and two inches too high. NOT FUN. Learn from me and take the time to make sure you’ve marked exactly where the elastic should go.


I added a few ruffles to the front of my dress (create long strips of fabric. For stretchy knit, create ruffles by setting the stitch length to 4 and the tension to 7. I just pinned them on and sewed in place.


I LOVE the finished results.

But I will never, ever, forget to mark a measurement again. Ever.


Still, cute dress for less than a buck? I’m a happy girl!

<3
Hattie

Thursday, April 22, 2010

for the love of white paint

If you read more than three home décor blogs, there’s a good chance you’ve seen these sweet birdie votive holders from the Dollar Tree.

The Easter Bunny brought me a pair and I used a foam brush and some pure white acrylic paint to shabby them up a bit.

I brushed on a layer of paint, not worrying about totally covering the old paint job.


Once that was dry, I heavily dabbed more paint on to create a sort of stucco texture.


Easy peasy!

I’m pretty enamored with them.


As you can tell by the gratuitous number of pictures.


Please love me anyway?

I'm posting this to http://shabbynest.blogspot.com/2010/04/frugal-friday_22.html

Just for fun, what’s your favorite thing you’ve painted white?

<3
Hattie

Tuesday, April 20, 2010

art in a hurry

As promised, I’m back today with the little art switcharoo I worked on this weekend. The best part of this project is that I had everything on hand and spent zero bucks to give our bedroom a bit more of a sprucing up.

I should have taken a before shot, but this is the print that used to hang over my nightstand. I still love it, and have plans for it elsewhere in the roost.


I knew I wanted to incorporate more blue and green in the artwork to go with the duvet and pillows, so I was thrilled when I stumbled upon this apple print on vintage printable.


I used spray adhesive, which I now think of as more of a frenemy than a straight up enemy, to glue the print to a mat I made from the same fabric as my lovely new lampshades.

Total love!


Over our TV (please don’t judge the cords – I super hate them!) I had these two art prints,

but I felt like they didn’t work well with the apple, so I dug up some more vintage fruit on vintage printable.

I also mounted these prints on extra lampshade fabric and framed them.


I tried to paint the frame the same color as the green in the duvet, but I sort of wish they were blue like the other apple frame. Of course, I don’t have any more French blue paint, so I guess I’ll live with them for awhile.

The color might just grow on me.

Do you have any favorite sources for cheap art? Do tell!


I’m linking this to Kimba’s DIY Day because she rocks my socks off!

<3
Hattie

Monday, April 19, 2010

Light it up

For me, DIY Day turned into more of a DIY weekend/week/month/never-ending bedroom transformation. It started with the duvet cover, then came the pillows, and this weekend I tackled covering the lamp shades and some new art (stay tuned tomorrow for the art).


I love red, really, I love it. But I’ve never really loved these lampshades. For starters, they are cranberry, not a true red. Brad and I bought them at Lowe’s when we were first married and I remember having a semi-fight in the lighting aisle that went something like, “These aren’t really the right color.” “Well, buy the right color.” “They don’t have it.” “Well, just pick something! They’re just lampshades!” So, we bought the lampshades. This was before I learned that it’s better to enter Lowe’s knowing exactly what you want or leave your husband in the power tools aisle. Anyway, after three years, I decided to cover them.


To cover your own shades, make a template by tracing with a pencil as you roll the shade 360 degrees from the edge of the seam. Do this for both the top and the bottom. I found that an opened grocery bag was the perfect size for my template.


Cut out the template, adding about ½ an inch or so all the way around.

This is a good time to try wrapping the template around the shade to make sure it fits okay.

If all is good, pin the pattern to your fabric and cut out.

Use spray adhesive to attach the fabric to the lampshade. I won’t kid you, this was the hardest part for me, spray adhesive and I are not best friends. Once you wrangle the fabric on the shades, it should look something like this.


Next step, roll the edges of the fabric to the inside of the shade and secure with hot glue.

To give the shade a finished look you will need ribbon or seam tape. I made my own seam tape by folding and gluing long strips of matching fabric.

Very carefully, glue the seam tape to the inside edge of the shade to hide the raw edge. I suggest going slowly and gluing small sections at a time to keep everything nice and even.


And there ya go!


I like the way the lamps give off a warm reddish glow when they’re on.


It’s nice and cheery.

But I also love the plain linen look when the lights are off.


Although this was time consuming, I’d do this project again in a heartbeat!

Plus, I only sustained one hot glue burn which has to be some kind of record for me!

Happy DIY Day!

<3
Hattie