Showing posts with label clothes. Show all posts

Monday, July 25, 2011

stripes + floral tank

For some reason I've been on a crazy nautical kick this summer. So when I spotted a remnant of striped  jersey knit fabric at the fabric store, I had to have it. I was thinking summer tank, but I wanted to add a little something extra to it to put a twist on the nautical look.


I found this awesome floral fabric (actually a girl's dress) in my Goodwill fabric stash, and the stripes + floral summer tank was born.


This is a seriously easy tank to whip together in an hour or so, and it's a great stash buster as well.

To start, cut two rectangles of knit fabric. You want them to be as long as your favorite summer tank, plus 4 inches and as wide as your favorite summer tank plus 6 to 8 inches depending on how baggie you want the tank to be.

Fold the top edge of each rectangle down two to three inches, pin, and sew. This will create the pocket to hold your straps/ties.


Take a long strip of fabric five inches wide and a yard long (or longer) and fold in half lengthwise with the right sides together. Pin, sew, and turn right side out. This will be your straps/ties so you might want to angle the ends. I tied my straps in a small bow, so this length worked out fine for me. If you want a flouncy bow, you will want a longer strip of fabric.


Thread the long strip of fabric through the pockets at the tops of your knit rectangles. Use your favorite tank as a guide for how long to make the straps, but also try this on as well.


Once your straps are the right length, tie the extra fabric in a bow.


You will also need to pin and sew the sides of your tank closed. I pinned and sewed about four inches from the top of the tank, but this will vary by body type, so  make sure you try the tank on after you've pinned but before you've sewed everything up.
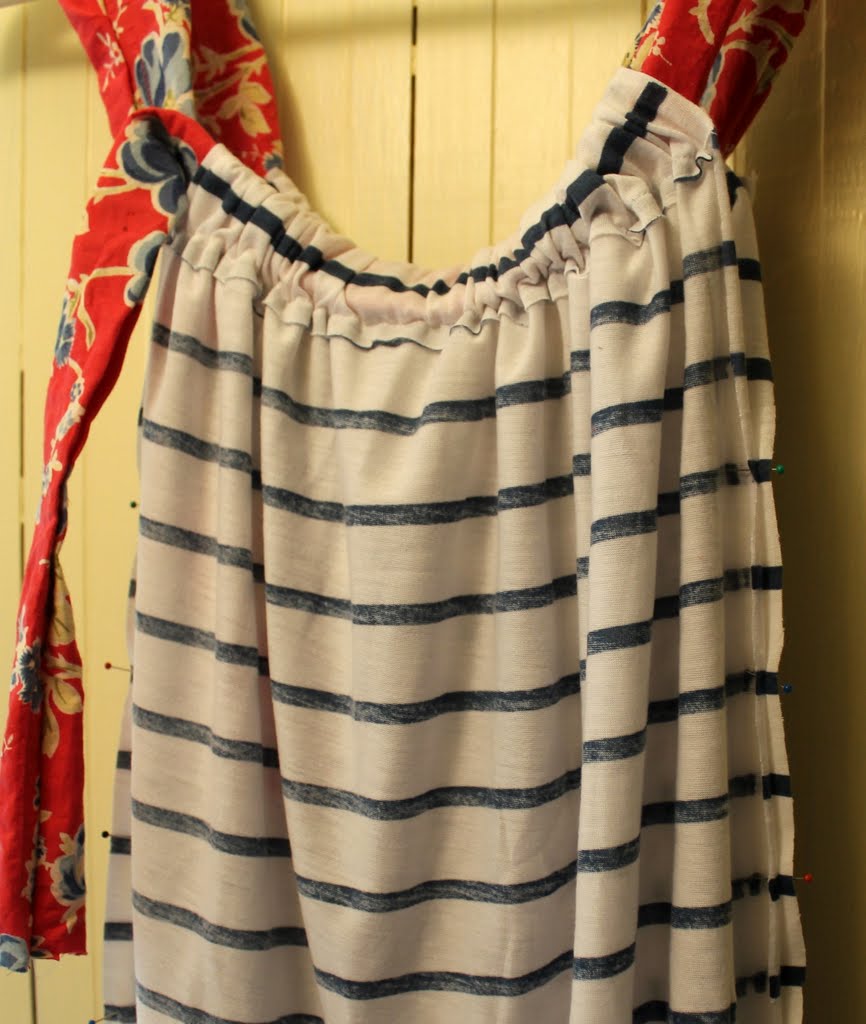

After the sides are done, you can also hem the bottom edge of the shirt. Knit doesn't unravel, so I decided to keep my bottom edges raw.


That's it!

I decided that I really like mine belted for a more tailored look, but it also looks great loose.


I love the way it drapes in the back.

What do you think? Mixing stripes and florals - good idea or fashion faux pas?

Linking to these parties:

Visit thecsiproject.com


Creative Itch


<3
Hattie

Monday, June 20, 2011

sunny day necklace

I made a fun fabric stash-busting necklace over the weekend.


This is super easy to make and will likely cost you zero bucks - ya know, if you happen to have a ridiculous amount of scrap fabric hanging around your craft room threatening to overrun the entire room like some kind of fabric kudzu vine. Not that I have that problem or anything.


Gather fabric, a few beads, scissors or a roller cutter, a button, and a needle and thread.


Start by cutting nine looooong and skinny strips of fabric and braiding them into three braids of varying lengths.


Next, add your beads (please pardon my tea cup rings! this is real life people)


On each side, braid the very ends of the three braids into one thicker braid and knot.

Leaving one long strip on each end, cut the other strips short, close to the knot. Sew the short, loose ends down to keep the knot from unraveling. On one side, sew the long strip into a loop.


On the other side, sew a button to the long strip.


Push the button through the loop to create the necklace closure.


Easy peasy! The braiding takes a bit, but it's the  kind of thing you can do while watching netflix.


Enjoy your cheerful sunny day necklace!

<3
Hattie

Sunday, June 5, 2011

rope me in


I'm embarrassed to admit how long it took me to figure out how to make these rope bracelets. I had the idea of criss-crossing fabric around rope to create a nautical look, but I had no idea how to create a clasp to hold the bracelet together. I tried weaving elastic through the rope, creating a hook closure by wrapping wire around the rope, and even creating a loop closure with ribbon and a button. I couldn't hit on anything that worked and looked good, so I set off to Hobby Lobby. I wanted to find a large bale finding that I could crimp around the ends of the rope, but they didn't have anything large enough. I picked up some E6000 glue and simple toggle clasps, hoping I'd come up with something. Right before I fell asleep last night, I finally figured out a solution. Why do all the best ideas come to you right before bed or in the shower? Maybe it's just me! Anyway, If you're still reading this and want to make one of these cuties, here's how!


You will need scrap fabric strips, a piece of rope long enough to reach around your wrist, a clasp, needle and thread, and duct tape.


Start by cutting two small squares of fabric, just big enough to wrap over the ends of the rope. Securely sew a clasp to the middle of each square of fabric.


According to the package directions, glue each fabric square to the ends of the rope.


I wanted to make sure the clasp wasn't going anywhere, so once the glue dried, I also used a needle and thread to sew the edges of the fabric square to the rope.


Next, criss-cross your fabric strip down the rope, and knot at the end.


I took a needle and thread and sewed the fabric to the rope on each end to keep it from unraveling.

To finish things off, take two small strips of colored duct tape and wrap them around each end of the rope to hide your stitches. If you don't want to use duct tape, you could probably cut extra strips of fabric and use fabric glue to hold them down.


I went ahead and made three bracelets so I can mix and match them.


I really liked how these turned out, so I'm glad I kept searching for an answer to my clasp conundrum!

What's the best idea you've come up with while half-asleep?

<3
Hattie

Monday, April 18, 2011

there's a hole in the elbow of my shirt...

To be sung to the tune of, "There's a hole in the bottom of the sea." There's a flake on the skin on the elbow on my arm poking out of the hole in the elbow of my shirt! There's a hole! There's a hole! There's a hole in the elbow of my shirt.


Yup, there's a hole in that there shirt. My pointy elbow tore right through it when I was in the middle of teaching a research lesson last week. Since I'm on spring break this week, I finally have time to share how I saved the shirt and outwitted the hole.

First step - (please pardon the icky lighting, I was so eager to start sewing, that I snapped away without thinking about the dim lighting) cut off that hole!


I turned my long sleeve shirt into a short sleeve shirt with a little sleeve trim-a-roo.

Step two - make the neckline more feminine.


This was as simple as cutting a 'V' into the front of the shirt.

Step three - make some ruffles


I cut inch wide strips out of my sleeve fabric and used my machine to create some random ruffles by pleating and shoving bits of the fabric under the presser foot as I sewed a straight line down the middle of the strips. Note: do not shove your finger under the presser foot as that will result in the needle piercing your skin, causing you to run to the bathroom with blood dripping down your hand - not that I know this from personal experience.

Step four -arrange and pin your ruffles.


I went for an asymmetric look with one ruffle on one side, three on the other, and three ruffle roses in the middle. Once I was happy with everything, I stitched it all down.


Step five - love your shirt


I've worn this three times so far and washed it once. Everything came out great, and the ruffles actually become a bit  more ruffly after a wash.


I love it when I can save something from the trash bin and give it a little more life!

<3
Hattie

Thursday, September 23, 2010

ruffle your sweater

I spotted this cardigan at Banana Republic a few weeks ago.


It’s even lovelier in person. The ruffles are made from several different textures and types of fabric. As much as I wanted to take it home with me, I’m not the kind of girl who buys $80 sweaters.

However, I’ve been needing a new long sleeved white cardigan and I had this old H&M sweater hanging in my closet.

It didn’t take me long to spirit the sweater off to my sewing room and start reconstructing it into something more fun. I cut straight up the middle, folded the edges under, pinned, and sewed.


Next, I chose fabric for my ruffles. I like the two-tone look the original has, but I wanted to be able to wear this cardigan with a lot of different outfits, so I went for a monochromatic look.


I created my ruffles from a white t-shirt, a sheer cream scarf, and the white fabric from the inside of a necktie. I simply pinned the ruffles to the sweater and sewed them down.


I think my version is a bit fluffier than the original, but I’m pretty happy with it.


I may sew on a button closure, but for now, I love using a sweet little earing to cinch the cardigan together.


It also looks pretty cute belted.

Let me know if you make your own ruffled cardigan, I’d love to see it!

I'm linking to Wendy's party!


<3
Hattie

Tuesday, September 7, 2010

Flirty skirt

Remember the J. Crew skirt I ogled from afar?


Well, I took advantage of the long weekend to create my own knock-off version.


I can’t wait for the weather to cool off a bit so I can wear it!


I used a skirt I already had to create this version, but I plan to also make one from scratch.

My existing skirt was A-line, below knee length, and had a high waist. It was also lined.


I started by deciding how short I wanted the finished skirt to be, then I cut off the top of the skirt to that length.

Next, I turned the skirt inside out, pinned the lining to the top edge of the skirt, and sewed.

After that, I flipped the skirt back to normal with the pretty side of the fabric facing out and the lining on the inside. I pinned very close to the top edge of the fabric and topstitched all around.

Next, I topstitched twice more at equal intervals.

This created two pockets to hold elastic for the waistband. I used my seam ripper to make small slits in each pocket, and used a safety pin to thread the elastic through. I cut each strip of elastic to a length slightly smaller than my natural waist.

Once the ends of the elastic are sewn together, they create a cute ruffled waistband like this.
I think I like my free version just as much as the 80 buck store version!

Here’s how it looks on:


What styles are you planning to knock off this season?

Linking to the Creative Itch!


Photobucket

And the Train to Crazy!
make it wear it
<3
Hattie