Fall means apple cider, crunching leaves, buying new boots, and a reason to make a new duct tape purse.
This lovely new bag has lots of room for all the items I feel the need to cart around (electronics, books, water bottle, sweater, etc.) and the punchy plaid trim makes me smile. Before it was a fun fall purse, it was a humble free gift with purchase makeup bag.
I cut off the old handles and covered everything in merlot mania duct tape, leaving a few empty strips to allow me to sew on the trim. Sewing through duct tape is not advised unless you want to go crazy and kill your sewing machine needle.
I used a plaid skirt from Goodwill to make the pocket ruffle and handles.
Pretty easy peasy and custom fit to me!
Oh, duct tape, my life just wouldn't be as fun and crafty without you!
<3
Hattie
Showing posts with label How-to. Show all posts
Thursday, September 22, 2011
Tuesday, August 30, 2011
playing with paint
In preparation for turning our dated second hand buffet into a super cool master bath vanity with a driftwood finish, I decided I had better play with some paint. I didn't want to practice on the buffet, so I used free hardwood flooring samples as my guinea pigs.
Have you every created a faux finish?
<3
Hattie
I started by using a liquid deglosser. Since the buffet has a wood veneer finish, I plan on sanding only very, very lightly. I think the deglosser will give the paint a little extra oomph to stick. Zinser primer will help as well!
I used three tones of paint: very pale gray, medium gray, and darker brown gray (official fancy names at the end of the post). For the first sample, I started with the darkest shade, painted in on, waited 20 seconds, and rubbed it off with a rag.
For the sample number 2, I used the darkest shade again, in one thin coat, and did not rub any of it off.
For sample number 3, I used the lightest shade in one thin coat, and did not rub any off.
Sample number one received a second coat, this time with the middle shade of gray. Again it was brushed on and rubbed off with a rag.
Samples two and three both received coats of the middle shade of paint.
Here's sample two with with second coat of paint rubbed off.
And here's sample three. Note that the paint was not sticking very well to this sample. It was very glossy to start with, and I should have used a second coat of deglosser on this one!
To finish sample one, I brushed on the lightest shade of gray and rubbed it off with a towel. The color was much lighter than what I wanted, so I took a tiny bit of the darkest paint on a dry brush and used that over the top.
I did the exact same thing to sample number two.
For sample number three, I brushed on the darkest shade of gray and rubbed most of it off with a towel.
So what did I learn from my painting party? I love the "grain" of sample number one. Dry brushing with minimal paint is the way to go if you're looking for a rustic, weathered finish. However, I like the color tones of number three the best. So, my plan of attack for painting the buffet? 1. Sand, 2. degloss, 3. prime, 4. lightest shade of paint (valspar tempered gray), 4. medium shade of paint (valspar aspen gray), 5. darkest shade of paint ( valspar seine) (all dry brushed over the primer), and 5. a coat of clear sealer.
As soon as the summer humidity says goodbye, I'm going to throw on my painting clothes and get to work!
Have you every created a faux finish?
<3
Hattie
Wednesday, August 24, 2011
Mod shoes
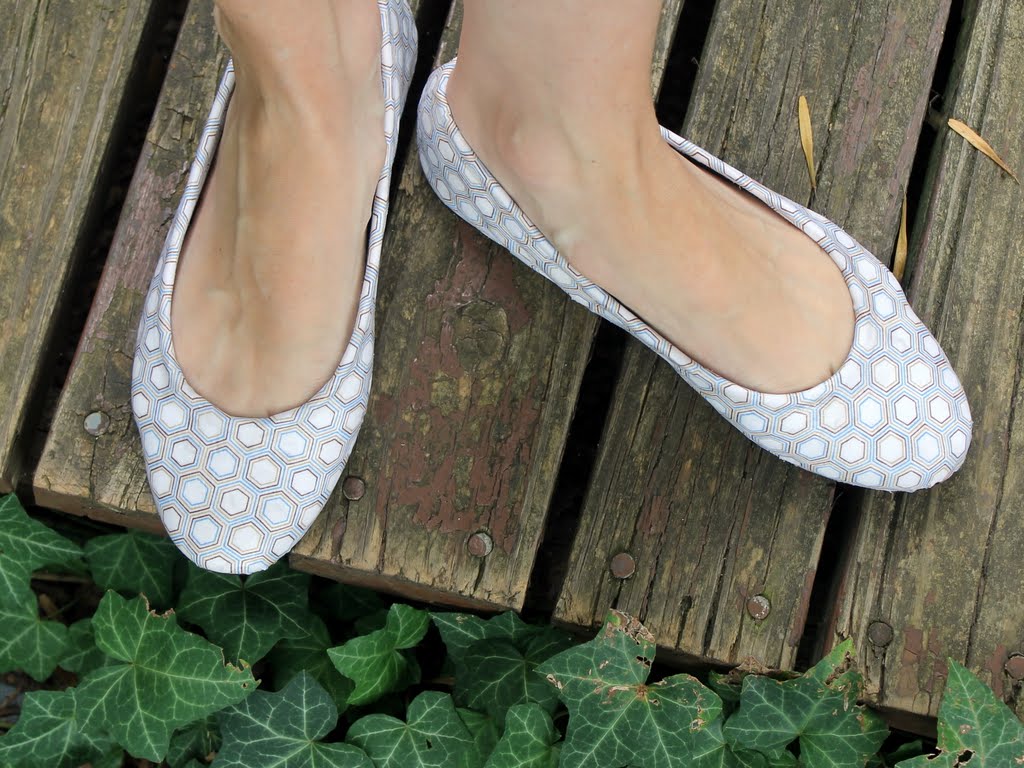
One of my very first pins on Pinterest was to this tutorial for mod podge shoes. I finally found the perfect shoes to cover in fabric, so I had to try it out!
You will need old flats, Outdoor Mod Podge, fabric, scissors, and an xacto knife.
Start by draping fabric over your shoes to determine the amount you will need to cover them. Trim the fabric so you have a little extra all around the edges of the shoe.
Cut a slit from one end of the fabric up to where the toe of the shoe starts.
Cover the shoe with mod podge a few small patches at a time and smooth the fabric down. I founded easy to start with the toe and work my way around to the heel.
When you get to the heel, fold one end of the fabric over and glue on top of the other edge so you have a clean seam down the back of the heel.
Now it's time to fold the extra fabric inside the shoe. Cut a few triangle slits into the fabric so it will fold under easily. Use mod podge to secure.
Let the shoe dry. Once dry apply a thin top coat of mod podge.
When that is dry, use an xacto knife to carefully and firmly trim the remaining excess fabric next to the sole.
Finally, apply a final coat of mod podge over the top of the shoe.
This whole process was much easier than it sounds but I do have a few tips:
- let the glue dry thoroughly between each coat.
- do not attempt this during high humidity. It took my glue forever and a day to dry.
- pay close attention when gluing the fabric next to the sole. Press extra hard here and use your fingernail to score the fabric into seam where the leather meets the rubber sole.
I have no idea how well these will hold up, but I was just going to throw the shoes away and I had the fabric in my stash, so they were practically free.
Cute and free, those are my kind of shoes!
<3
Hattie
You will need old flats, Outdoor Mod Podge, fabric, scissors, and an xacto knife.
Start by draping fabric over your shoes to determine the amount you will need to cover them. Trim the fabric so you have a little extra all around the edges of the shoe.
Cut a slit from one end of the fabric up to where the toe of the shoe starts.
Cover the shoe with mod podge a few small patches at a time and smooth the fabric down. I founded easy to start with the toe and work my way around to the heel.
When you get to the heel, fold one end of the fabric over and glue on top of the other edge so you have a clean seam down the back of the heel.
Now it's time to fold the extra fabric inside the shoe. Cut a few triangle slits into the fabric so it will fold under easily. Use mod podge to secure.
Let the shoe dry. Once dry apply a thin top coat of mod podge.
Finally, apply a final coat of mod podge over the top of the shoe.
This whole process was much easier than it sounds but I do have a few tips:
- let the glue dry thoroughly between each coat.
- do not attempt this during high humidity. It took my glue forever and a day to dry.
- pay close attention when gluing the fabric next to the sole. Press extra hard here and use your fingernail to score the fabric into seam where the leather meets the rubber sole.
I have no idea how well these will hold up, but I was just going to throw the shoes away and I had the fabric in my stash, so they were practically free.
Cute and free, those are my kind of shoes!
<3
Hattie
Thursday, August 11, 2011
Welcome home map
To spread my love of maps to the masses, I made a little welcome home map art as a housewarming gift for my friend Andy. He recently purchased his first home, so a non-girly gift was in order.
I was inspired by this map that I found on Pinterest. The heart was a bit too girly, so I had to change things up to make it suitable for Andy.
I started by typing his address into Google maps. I used the snipping tool (Thank you, Windows 7) to take a screen shot of the part of the map I wanted.
Next, I inserted the image into Word and layered shape art and text boxes to create a "Home, first, home" bubble, complete with his new address. I blurred it in this photo to protect Andy's privacy.
I added a mat and a frame and his personalized housewarming gift was done!
linking here:

<3
Hattie
I was inspired by this map that I found on Pinterest. The heart was a bit too girly, so I had to change things up to make it suitable for Andy.
I started by typing his address into Google maps. I used the snipping tool (Thank you, Windows 7) to take a screen shot of the part of the map I wanted.
Next, I inserted the image into Word and layered shape art and text boxes to create a "Home, first, home" bubble, complete with his new address. I blurred it in this photo to protect Andy's privacy.
I added a mat and a frame and his personalized housewarming gift was done!
linking here:
<3
Hattie
Monday, July 25, 2011
stripes + floral tank
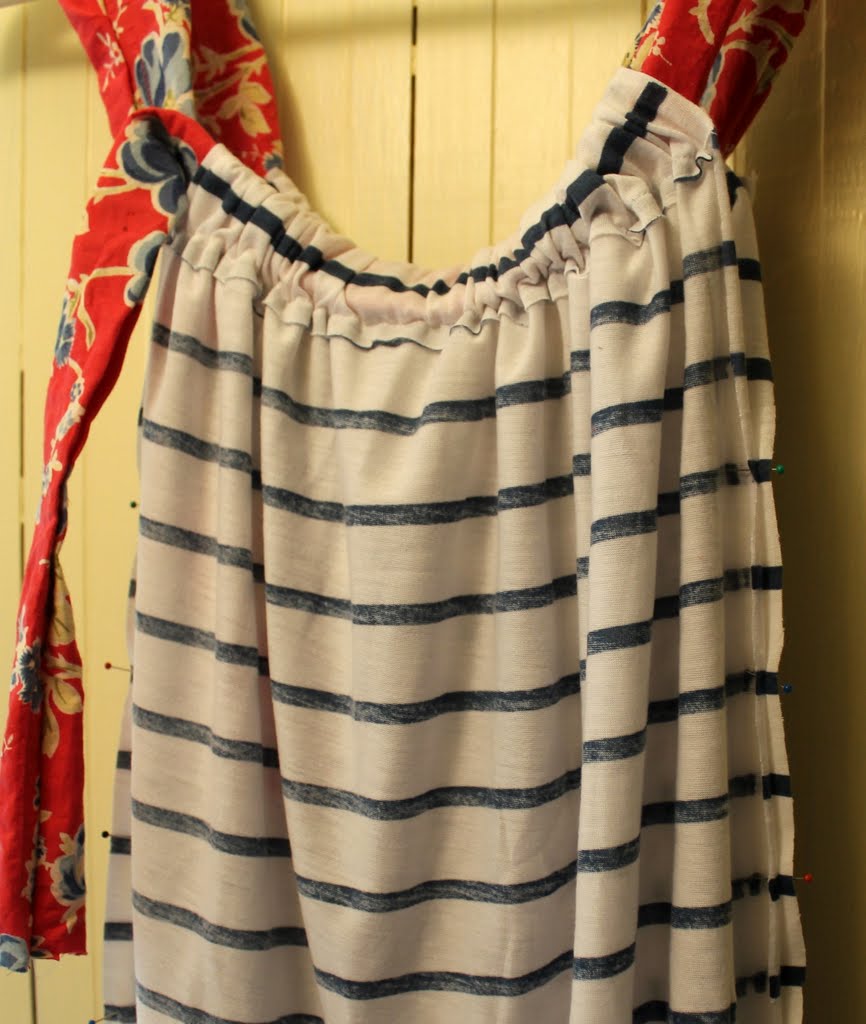
For some reason I've been on a crazy nautical kick this summer. So when I spotted a remnant of striped jersey knit fabric at the fabric store, I had to have it. I was thinking summer tank, but I wanted to add a little something extra to it to put a twist on the nautical look.
I found this awesome floral fabric (actually a girl's dress) in my Goodwill fabric stash, and the stripes + floral summer tank was born.
This is a seriously easy tank to whip together in an hour or so, and it's a great stash buster as well.
To start, cut two rectangles of knit fabric. You want them to be as long as your favorite summer tank, plus 4 inches and as wide as your favorite summer tank plus 6 to 8 inches depending on how baggie you want the tank to be.
Fold the top edge of each rectangle down two to three inches, pin, and sew. This will create the pocket to hold your straps/ties.
Take a long strip of fabric five inches wide and a yard long (or longer) and fold in half lengthwise with the right sides together. Pin, sew, and turn right side out. This will be your straps/ties so you might want to angle the ends. I tied my straps in a small bow, so this length worked out fine for me. If you want a flouncy bow, you will want a longer strip of fabric.
Thread the long strip of fabric through the pockets at the tops of your knit rectangles. Use your favorite tank as a guide for how long to make the straps, but also try this on as well.
Once your straps are the right length, tie the extra fabric in a bow.
You will also need to pin and sew the sides of your tank closed. I pinned and sewed about four inches from the top of the tank, but this will vary by body type, so make sure you try the tank on after you've pinned but before you've sewed everything up.
After the sides are done, you can also hem the bottom edge of the shirt. Knit doesn't unravel, so I decided to keep my bottom edges raw.
That's it!
I decided that I really like mine belted for a more tailored look, but it also looks great loose.
I love the way it drapes in the back.
What do you think? Mixing stripes and florals - good idea or fashion faux pas?
Linking to these parties:


<3
Hattie
I found this awesome floral fabric (actually a girl's dress) in my Goodwill fabric stash, and the stripes + floral summer tank was born.
This is a seriously easy tank to whip together in an hour or so, and it's a great stash buster as well.
To start, cut two rectangles of knit fabric. You want them to be as long as your favorite summer tank, plus 4 inches and as wide as your favorite summer tank plus 6 to 8 inches depending on how baggie you want the tank to be.
Fold the top edge of each rectangle down two to three inches, pin, and sew. This will create the pocket to hold your straps/ties.
Take a long strip of fabric five inches wide and a yard long (or longer) and fold in half lengthwise with the right sides together. Pin, sew, and turn right side out. This will be your straps/ties so you might want to angle the ends. I tied my straps in a small bow, so this length worked out fine for me. If you want a flouncy bow, you will want a longer strip of fabric.
Thread the long strip of fabric through the pockets at the tops of your knit rectangles. Use your favorite tank as a guide for how long to make the straps, but also try this on as well.
Once your straps are the right length, tie the extra fabric in a bow.
You will also need to pin and sew the sides of your tank closed. I pinned and sewed about four inches from the top of the tank, but this will vary by body type, so make sure you try the tank on after you've pinned but before you've sewed everything up.
After the sides are done, you can also hem the bottom edge of the shirt. Knit doesn't unravel, so I decided to keep my bottom edges raw.
That's it!
I decided that I really like mine belted for a more tailored look, but it also looks great loose.
I love the way it drapes in the back.
What do you think? Mixing stripes and florals - good idea or fashion faux pas?
Linking to these parties:
<3
Hattie
Friday, July 22, 2011
Nautical Chevron Bracelet
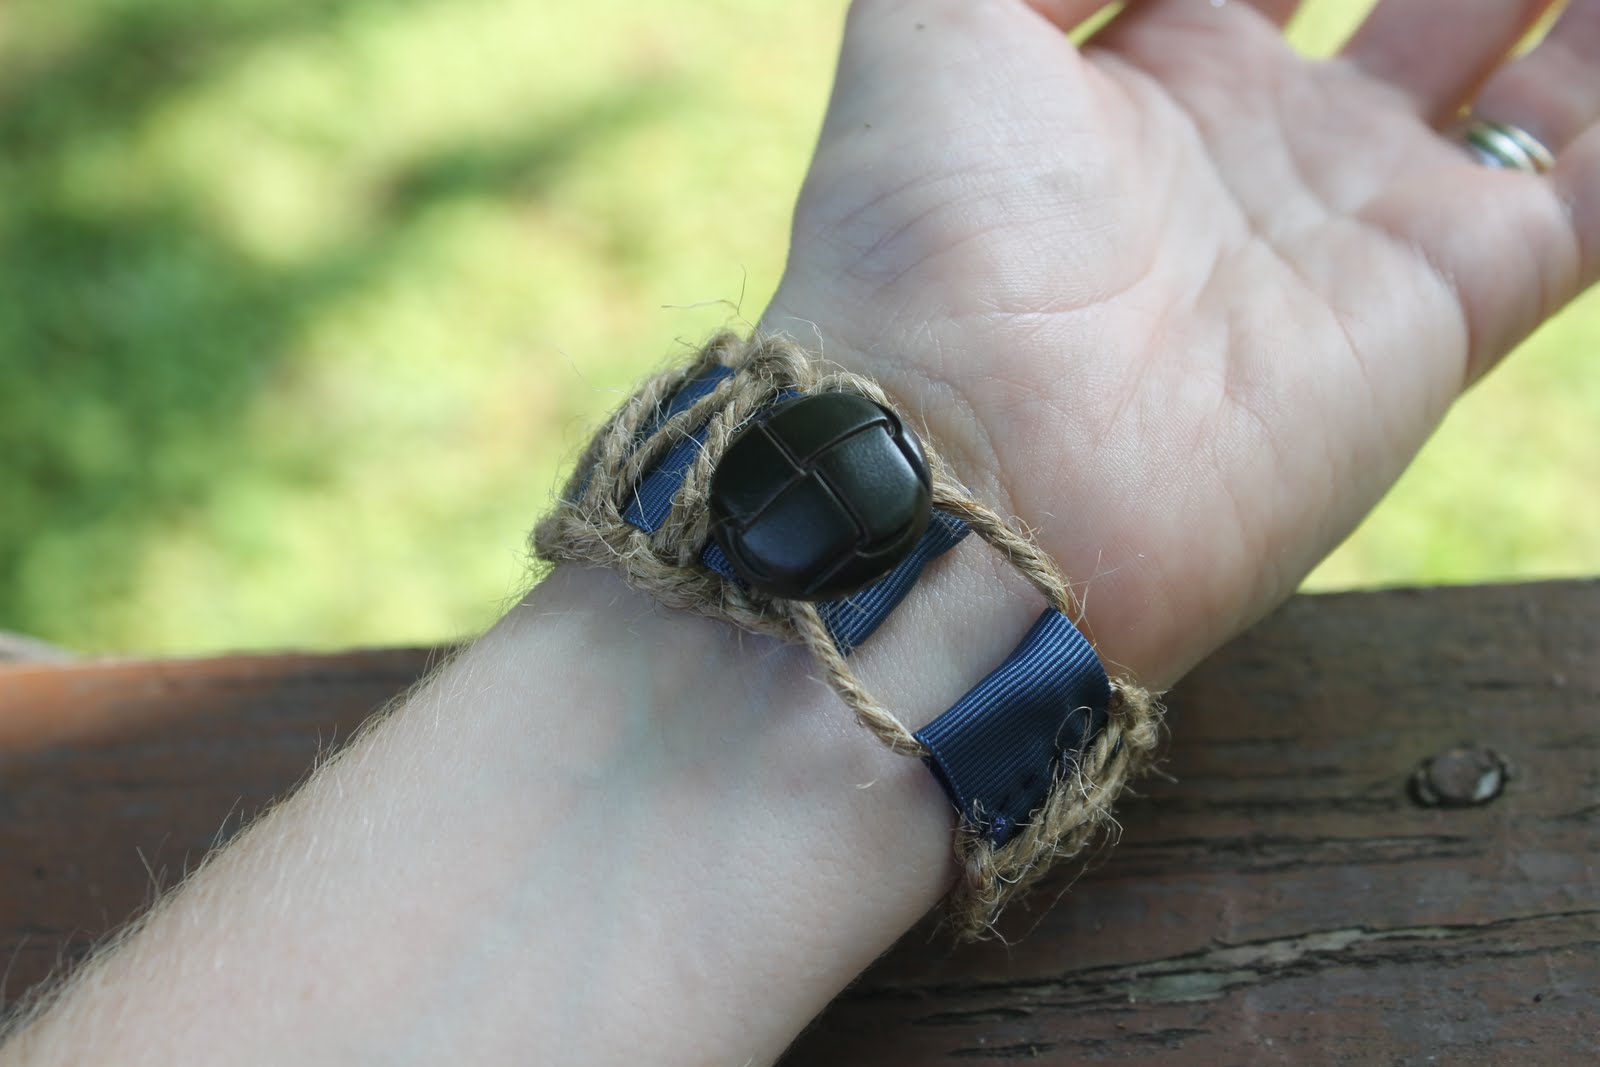
I had a brainwave yesterday. Shocking, I know, but it does happen sometimes! I was thinking about the hemp friendship bracelets I used to make in high school and how to make them a little more grown up. My eyes landed on a spool of navy grosgrain ribbon, and the nautical chevron bracelet was born.
It turned out to be super quick and easy to make, my kind of project!
To make your own, you will need: ribbon (long enough to wrap around your wrist plus three inches), 5 ft of jute twine, a button, and a needle and thread.
Fold the twine in half and knot at the top, leaving a loop. Slip the loop through the ribbon.
Fold the ribbon over and pin. you can sew this shut now or later.
Take the twine on the left side and pull it over the ribbon and under the twine on the right side.
Now, take the twine on the right side, bring it under the ribbon, and...
... pull it up through the loop on the left side.
Carefully, pull the twine on each side to tighten the knot. Now you are going to do exactly the same thing, starting on the other side.
Take the twine on the right side and bring it over the ribbon and under the twine on the left side.
Now, take the twine on the left side, bring it under the ribbon, and...
... pull it through the loop on the right side.
Carefully tighten, making sure not to squeeze the ribbon.
Repeat the pattern of alternating your knots until the bracelet is long enough to fit around your wrist.
Knot the twine.
Fold the ribbon over, and sew shut.
Trim the ends of the twine.
Sew on your button.
Enjoy your adorable new bracelet, and have a wonderful weekend!
<3
Hattie
It turned out to be super quick and easy to make, my kind of project!
To make your own, you will need: ribbon (long enough to wrap around your wrist plus three inches), 5 ft of jute twine, a button, and a needle and thread.
Fold the twine in half and knot at the top, leaving a loop. Slip the loop through the ribbon.
Fold the ribbon over and pin. you can sew this shut now or later.
Take the twine on the left side and pull it over the ribbon and under the twine on the right side.
Now, take the twine on the right side, bring it under the ribbon, and...
... pull it up through the loop on the left side.
Carefully, pull the twine on each side to tighten the knot. Now you are going to do exactly the same thing, starting on the other side.
Take the twine on the right side and bring it over the ribbon and under the twine on the left side.
Now, take the twine on the left side, bring it under the ribbon, and...
... pull it through the loop on the right side.
Carefully tighten, making sure not to squeeze the ribbon.
Repeat the pattern of alternating your knots until the bracelet is long enough to fit around your wrist.
Knot the twine.
Fold the ribbon over, and sew shut.
Trim the ends of the twine.
Sew on your button.
Enjoy your adorable new bracelet, and have a wonderful weekend!
<3
Hattie
Subscribe to:
Posts (Atom)